Granted, we’re not doing a lot of potluck-ing or classroom party-ing this year, but these treats are great to make at home with your kids over the holiday break. Give them away or enjoy them yourselves!
I used a Christmas Tree cookie cutter to make these, but you could use any cookie cutter and icing/sprinkle combination in order to turn them into treats for Halloween, Easter, springtime, birthdays, etc.
Also, this icing recipe will dry hard after 4-6 hours, so you can stack your cookies or package them individually to give away.
Festive Frosted Rice Krispies Treats
Ingredients for Rice Krispies:
6 cups Rice Krispie cereal
1-10oz package of marshmallows
3 Tbsp. butter
Frosting Ingredients:
2 egg whites
2 2/3 cups powdered sugar
food coloring of choice
sprinkles of choice
Directions:
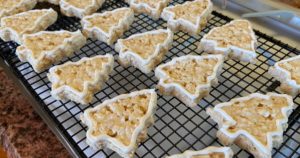
Make Rice Krispies treats by melting butter in a large saucepan over medium-low heat. Add marshmallows and stir until completely melted. Add in Rice Krispies and stir until well combined. Spread into a cookie sheet pan (not a 13×9 in. pan) sprayed with cooking spray using a buttered spatula, or your hands. Let cool and harden for at least an hour. Put in the fridge if you want them to be very firm and easier to cut.
Once cooled, using cookie cutter of choice, cut out shapes. Lay them on a cooling rack or a sheet of parchment paper for icing.
*Tip: You may need to assist your cookie cutter by using a knife to cut them out.
Icing Directions:
In a microwave safe container, mix egg whites and 1 1/3 cup of powdered sugar until combined (will not be smooth but try to get out most lumps). Microwave for 30-60 seconds, or until temperature reaches close to 160 degrees F when tested with an instant read thermometer.
Transfer the mixture into a larger mixing bowl. Add the other 1 1/3 cup powdered sugar and beat with an electric mixer until smooth and stiff peaks form when you pull out the beaters.
Frosting your Trees:
Place about 1/2 cup of this frosting into a piping bag (or you can cut the corner off a plastic sandwich bag and put a frosting tip and coupler in it) fitted with frosting tip #5. If you’re not familiar with frosting tips and couplers, check out this tutorial.
*Tip: While you’re piping the outline on each of your trees, cover the remaining frosting with plastic wrap because it will harden quickly when exposed to air.
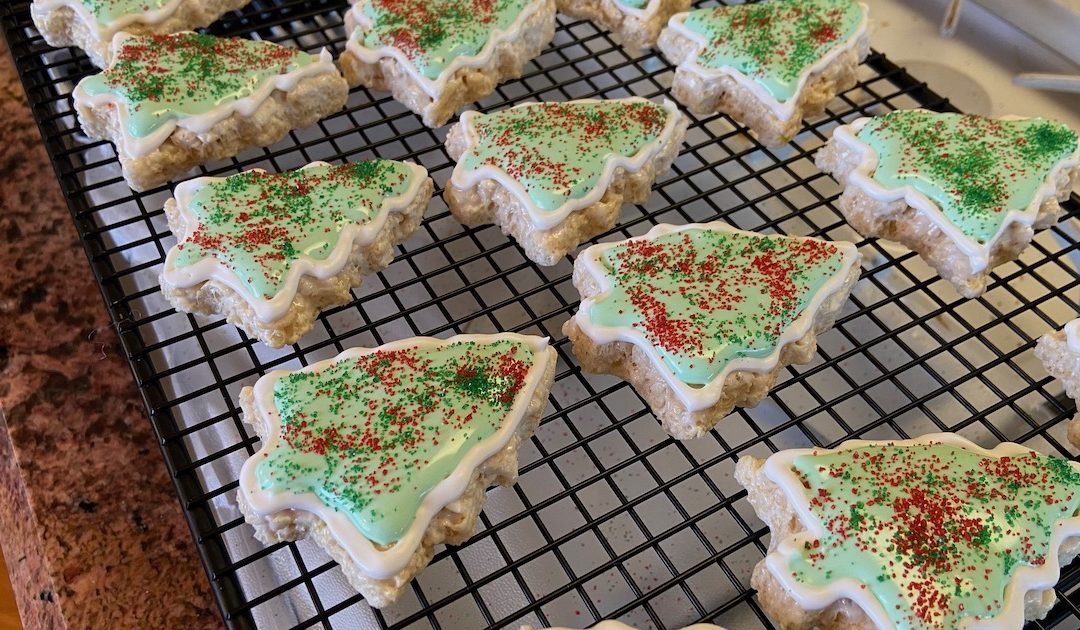
Pipe the outline of your trees using this white frosting as seen in the photo below. Let dry and harden while you mix up the green frosting color. This outline creates a border and keeps your other frosting from sliding off the side, so make sure it has contact with the entire edge of the treat.
Once you’re done with the outline, add any remaining frosting back into the bowl. Add several drops of green food coloring and mix until combined. You can add more food coloring until you get the color you want. Add in a tablespoon of water at a time and mix with your beaters until the consistency is a bit more runny than the white frosting was. This frosting is for filling in, so you want it to pour out pretty easily, but not so runny that it runs all over like water.
*Tip: if you add too much water, you can always add more powdered sugar to thicken it back up.
Place the green frosting into a different piping bag fitted with tip #12. Make sure your white border is firm before filling in with the green.
When filling in, you don’t need to frost up to the edge because the frosting should be soft enough to run right up to the border. Keep in mind, this doesn’t have to be perfectly up to the edge. It will be delightful to look at and delicious to eat, no matter how the frosting turns out.
My finished product:

*Tip: if your frosting needs a little help filling in, you can use a toothpick and pull it to the corners of where you want it to go.
This frosting will begin to set immediately, so add any sprinkles or decorations right away. A perfect way to involve your kids is to let them do the sprinkles!
If you want to layer on other colors of frosting, be sure to let the green dry before adding any other colors. You could reserve some of the original white frosting and add yellow stars or red lights.
Let dry and you’re done! They’ll be try to the touch within 30 minutes or so, but wait at least 4 hours before stacking or bagging them.
Happy decorating!